Introducing the Linux command line
by Carl Burch, Hendrix College, August 2011

Introducing the Linux command line by Carl Burch is licensed under a Creative Commons Attribution-Share Alike 3.0 United States License.
Based on a work at www.cburch.com/books/cmdline/.
Contents
Section 2. Accessing the command line
Section 3. Searching text: grep
Section 4. File redirection
Section 5. Command-line options
Section 6. Selecting text: head, cut
Section 7. Pipes
Section 8. Rearranging input: sort
Section 9. Counting: uniq
Section 10. Directory navigation: cd
Section 11. Learning more: man, other commands
Summary of described commands
Further reading
A command-line interface is a very old way of interacting with a computer, using only a keyboard; pointing devices such as a mouse are useless. Using a command-line interface, the user sees a terminal in which new characters appear only at the bottom of the screen. To start a program, a user types the program's name and presses the Enter key; if the program interacts with the user, it would display some text, and the user could type in a response. This is in marked contrast to a graphical interface, where a user would start a program using a pointing device and then interact with it by selecting areas of the screen with the pointing device and occasionally typing on the keyboard.
Our goal here is to learn how to interact with Linux systems through the command line, though several of the lessons learned here would apply equally to Windows, MacOS, UNIX, and many other systems you might encounter. By the end, you should understand some of the very basic Linux commands for processing text, and you should be familiar with combining these basics commands to do more useful things than any one command can perform.
1. Why?
But first, we first need to tackle the question: Why learn about command lines at all? After all, most people today easily use computers without touching a command-line interface. Instead, they use a graphical interface.
For all modern operating systems, though, the most proficient users continue to find the command-line interface very useful. There are several reasons for this:
A command-line system allows commands to be combined in ways that no graphical interface has managed to match.
Many systems provide some functionality that is accessible only through the command line. Or for those proficient with the command line, they can more easily access some information from the command line than the graphical interface allows.
One can easily write a
script file
listing several commands that should be executed in sequence, which a user can then execute by simply invoking the script file — in essence writing a simple program. This can save a lot of time if you find yourself running the same complicated sequence of instructions repeatedly. It is also useful when you need to do exactly the same thing on several computers that you administer.A command-line interface is particularly convenient when one needs to access a system remotely: Rather than a system that involves transmitting the entire screen, the system needs only to transmit a simple stream of characters.
2. Accessing the command line
The first thing you'll need to do is to access the command line. Exactly how you do this will vary based on how your Linux system is set up, but if you're using a graphical interface, you will want to start an application. Some possible names for this application are Terminal, Konsole, Gnome Terminal, or xterm.
Once you start the application, you'll find that it displays a window that looks something like this:
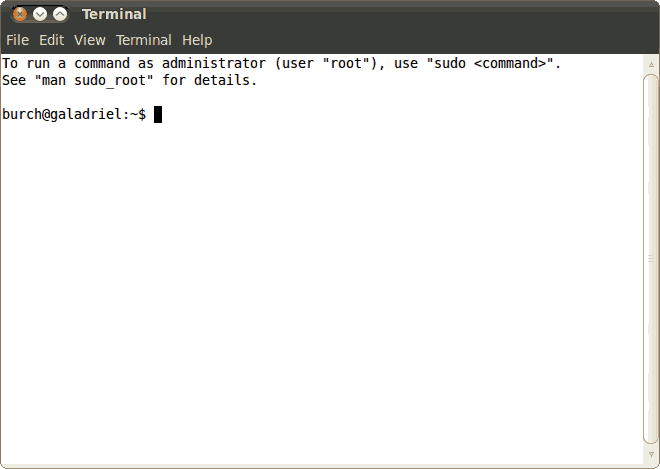
The important part of the window is the last text on the screen:
burch@galadriel:~$ _
This is a prompt, telling you that the terminal is waiting for you to enter a command to be executed. On my computer, the prompt reminds me of my login name (burch), the name of the computer I'm using (galadriel), and my current directory (~, which we'll discuss in Section 10), followed by a dollar sign.
3. Searching text: grep
Let's start with a particularly useful command that examines the contents of a file: grep. Its name doesn't give much of an indication of its purpose, but the purpose of grep is to identify lines that contain a pattern specified by the user. For lines matching the pattern, grep simply echoes those lines back to the user.
Admittedly, this behavior doesn't seem very useful right now — but you'll find it useful later. We have to start somewhere.
Here's a simple example: We'll start grep with a request that it repeat any line containing the two-letter sequence ow. In our illustrated examples, by the way, green boldface denotes text that the user has typed, while text displayed by the computer is written in normal text (black or blue). While not explicitly indicated, the user must press the Enter key at the end of each line where the user has typed anything, so that the terminal knows the user is done entering information.
burch@galadriel:~$ grep ow
I never saw a purple cow.
I never saw a purple cow.
I never hope to see one.
But I can tell you, anyhow,
But I can tell you, anyhow,
I'd rather see than be one!
(Control-D)
burch@galadriel:~$
At the end, you can see that the user enters control-D; you would do this by holding the Ctrl key down while pressing the D key. This indicates to grep that the user has completed entering text, and so grep should exit. The terminal will then allow the user to enter an additional command, as indicated by the repetition of the prompt.
In the above example, we have entered a two-word sequence as
our command:
grep ow
. The first word is the command
name, and the second is a command-line argument. A
command-line argument modifies how the command works.
We could instead have entered grep see
,
and grep would instead look for lines
containing an s followed immediately by an e and
then another e; if we entered the same poem,
grep would repeat the second and fourth lines
(rather than the first and third as before).
4. File redirection
Now suppose you happened to have a file containing a poem, and you want to display the lines containing the letter sequence eve. You could laboriously type the poem again, line by line, to see which lines grep would repeat; but you could alternatively use input redirection to ask grep to retrieve its input from the file rather than from the keyboard.
You indicate input redirection using the less-than symbol '<'. Here's how it would look if the poem were saved into a text file named poem.txt.
burch@galadriel:~$ grep eve < poem.txt
I never saw a purple cow.
I never hope to see one.
Notice that the file itself does not appear on the screen — just the lines that happen to contain the letter sequence that we requested.
(By the way, the grep command happens to permit a
second command-line argument, so you could alternatively type
grep eve poem.txt
and see exactly the
same output. But this second command-line argument is something
that's built into the grep program,
not a general-purpose concept — though it's typical for a program
to handle an optional
command-line argument naming a file to be read.)
You can also indicate output redirection with a greater-than sign '>'. This says that instead of displaying the results on the screen, the output should be saved into a file.
burch@galadriel:~$ grep eve < poem.txt > eves.txt
As you can see, nothing appears on screen. But if you were to open up the eves.txt file, you would find that it contains the first two lines of the poem.
5. Command-line options
Most Linux programs support command-line options, which are optional command-line arguments that lead a command to work in slightly different ways. The command-line options are almost always denoted by an argument starting with a minus sign '-'.
We've already seen that you can easily use grep with no command-line options. For example, to select all lines with a letter b, you would do the following.
burch@galadriel:~$ grep b < poem.txt
I'd rather see than be one!
However, this omits the third line, which starts with a
capital B! That's because grep
treats capital letters and lower-case letters as different.
However, you can include a command-line option
-i
to tell it to ignore this distinction between
capital and lower-case letters. To do this, we'll simply add a
command-line argument -i
immediately after the
command's name.
burch@galadriel:~$ grep -i b < poem.txt
But I can tell you, anyhow,
I'd rather see than be one!
Another particularly useful command-line argument
for grep is the -v
option. This tells
grep to display all lines that do not contain
the indicated sequence. For example, if I want to list all lines
of the poem without the word see, I can do
the following:
burch@galadriel:~$ grep -v see < poem.txt
I never saw a purple cow.
But I can tell you, anyhow,
If I wanted to list all lines that exclude the
letter b (capitalized or lower-case), then I could
combine the -v
option with -i
.
burch@galadriel:~$ grep -v -i b < poem.txt
I never saw a purple cow.
I never hope to see one.
Nearly all Linux commands expect any command-line options to be listed immediately after the command name. The order among command-line options typically does not matter.
6. Selecting text: head, cut
For the rest of this introduction, we'll be working with a file named states.txt [link], which contains a line corresponding to each of the 50 U.S. state, in alphabetical order by the state's name. Each line contains four pieces of information about its state, separated by tab characters:
- The line starts with the date when the area first became a U.S. state.
- Then is the state's population in thousands according to the 2010 census.
- Then is the state's postal abbreviation.
- And finally is the state's name.
We can view the first three lines out of this file using
the head command. By
default, head shows the first ten lines of
its input,
but you can alter the number of lines by including
the -n
option followed by the
number of lines to display.
burch@galadriel:~$ head -n 3 < states.txt
1819-12-14      4780    AL      Alabama
1959-01-03      710     AK      Alaska
1912-02-14      6392    AZ      Arizona
Both grep and head
work horizontally
— they select lines out of the
file. Sometimes it turns out to be useful to work
vertically
, selecting a range of information from every
line of the file. The cut command is useful
for this vertical selection.
In this example, we're working with a file where each
line is separated into columns by a tab character.
Such tab-separated columns are particularly well-adapted
to cut's purpose:
We can use the -f
option followed by a number
to indicate a column that we wish to cut out of the file.
For instance, we would write cut -f 3
to retrieve
the third column of each line, which would hold the state abbreviation.
burch@galadriel:~$ cut -f 3 < states.txt
AL
AK
AZ
  (and so on)
Or we could ask for multiple columns by listing the column numbers separated by commas (and no spaces).
burch@galadriel:~$ cut -f 1,4 < states.txt
1819-12-14      Alabama
1959-01-03      Alaska
1912-02-14      Arizona
  (and so on)
You can alternatively request certain characters from each
line using the -c
option. Below, we ask for just
the first four characters of each line, which would be each
state's year of admission.
burch@galadriel:~$ cut -c 1-4 < states.txt
1819
1959
1912
  (and so on)
7. Pipes
Most Linux commands do relatively simple things, like grep, head, and cut. Quite often, your job is more complex and is really a combination of the work that the individual commands perform. For example, suppose you want to list the state abbreviations that contain an R. We can do this by using cut to retrieve just the abbreviations out of states.txt, and we can use grep to select abbreviations including an R. But we want to do both of these things together.
Based on what we know so far, the natural way to do this is to use output redirection to save all the abbreviations emitted by cut into one file, and then use input redirection to send this file into grep to search for R's among them.
burch@galadriel:~$ cut -f 3 < states.txt > abbrevs.txt
burch@galadriel:~$ grep R < abbrevs.txt
AR
OR
RI
But such work turns up often enough that Linux provides an extremely useful shortcut called a pipe, where you use the vertical-bar character '|' to join two commands into one line. This indicates that any output from the first command should be piped over as the input to the second command. There is no need to create an intermediate file.
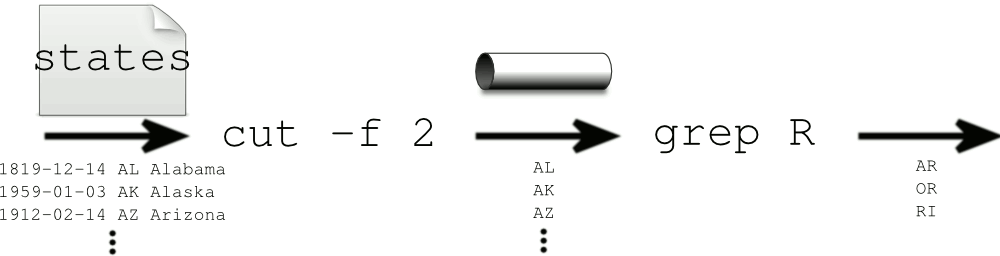
burch@galadriel:~$ cut -f 3 < states.txt | grep R
AR
OR
RI
This command sets up a structure as diagrammed below.
You can combine several pipes together. Suppose we want to list the first three state names containing a k (capital or lower-case). Here, we'd want to use cut to get just the state names, then grep to select those containing a k, and finally head so that only the first three are shown.
burch@galadriel:~$ cut -f 3 < states.txt | grep -i k | head -n 3
Alaska
Arkansas
Kansas
By the way, notice how the order is important in this command: If we used head before grep, head would produce the first three state names, and grep would select from among those which contain a k. The first three names would be Alabama, Alaska, Arizona, and the only one among them with a k is Alaska, so only Alaska would be displayed.
burch@galadriel:~$ cut -f 3 < states.txt | head -n 3 | grep -i k
Alaska
8. Rearranging input: sort
One of the more useful things to do to a sequence of lines is to sort them. Linux has a command to do this called, sensibly enough, sort. It's pretty easy to use.
burch@galadriel:~$ sort < states.txt
1787-12-07      898     DE      Delaware
1787-12-12      12702   PA      Pennsylvania
1787-12-18      8792    NJ      New Jersey
  (and so on)
While states.txt is in order by state name, sort's output has rearranged lines based on what comes first in each line — the admission date.
The sort command has lots of useful command-line
options. One of the simplest is -r
, which tells
sort to display in reverse order.
With states.txt, this would list the newest states
first.
burch@galadriel:~$ sort -r < states.txt
1959-08-21      1360    HI      Hawaii
1959-01-03      710     AK      Alaska
1912-02-14      6392    AZ      Arizona
  (and so on)
When your file is arranged into columns, you can use the
-k
option followed by a number to tell
sort to sort based on another column instead. For
example, if we wanted to sort based on postal abbreviation,
which is the third column in each line, we
can use the command-line option -k 3
.
In the below example, you can see that even though Alabama comes
first in the file, Alaska comes first in sort's output
since AK is earlier alphabetically than AL.
burch@galadriel:~$ sort -k 3 < states.txt
1959-01-03      710     AK      Alaska
1819-12-14      4780    AL      Alabama
1836-06-15      2916    AR      Arkansas
  (and so on)
Notice, however, that when you ask sort to use the second column (population), it doesn't quite work as you might expect.
burch@galadriel:~$ sort -k 2 < states.txt
1790-05-29      1053    RI      Rhode Island
1803-03-01      11537   OH      Ohio
1787-12-12      12702   PA      Pennsylvania
  (and so on)
You would probably expect Wyoming, with 564 thousand residents, to come first, rather than Rhode Island. But sort uses dictionary ordering: 1053 precedes 564 since the first character is earlier (1 precedes 5), just as bald precedes fee in the dictionary because of the first character (b precedes f).
Fortunately, there is a way to tell
sort to sort in numerical order instead:
Use the -n
option.
burch@galadriel:~$ sort -k 2 -n < states.txt
1890-07-10      564     WY      Wyoming
1791-03-04      626     VT      Vermont
1889-11-02      673     ND      North Dakota
  (and so on)
9. Counting: uniq
Sometimes you find that some lines are identical, particularly after sorting. For example, if we use cut to pull out the year of admission for each state, and then if we sort the years, we'd find that there are several states that entered the United States in 1787 and 1788.
burch@galadriel:~$ cut -c 1-4 < states.txt | sort
1787
1787
1787
1788
1788
  (and so on)
If we don't want 1787 and 1788 listed multiple times, we could use the uniq command to delete adjacent duplicates.
burch@galadriel:~$ cut -c 1-4 < states.txt | sort | uniq
1787
1788
1789
1790
1791
  (and so on)
The uniq command only identifies adjacent duplicates. If the input contains 1787, 1787, 1790, 1790, 1787, then the output would be 1787, 1790, 1787 — with 1787 listed twice since it appears in two different locations.
The -c
option to uniq is particularly useful:
With it, uniq displays
the number of duplicates found for each line.
burch@galadriel:~$ cut -c 1-4 < states.txt | sort | uniq -c
      3 1787
      8 1788
      1 1789
      1 1790
      1 1791
  (and so on)
Suppose you want to know which lines occur most often in the input.
You can do this by piping the output of
uniq -c
into sort again.
We'll want to do a numerical sort, and we'll want the output in
reverse order so the most common are listed first,
so this usage of sort
would use the -n
and -r
options.
For example, we could use the following command to see which years
saw the most states entering the U.S.
burch@galadriel:~$ cut -c 1-4 < states.txt | sort | uniq -c | sort -n -r
      8 1788
      4 1889
      3 1787
      2 1959
      2 1912
  (and so on)
Now we've built up a fairly long pipeline. Proficient users learn to build up long pipelines like this quite easily. Pipes are very helpful in combining several simple concepts to a more complex concept!
10. Directory navigation: cd
There are many files on even a minimalist Linux system, and it would be unwieldy to have all those thousands files reside simply in a flat list. So Linux (like all other prominent computer operating systems) organizes files into directories, each of which can hold files and/or other directories. The result is a hierarchy of directories, as illustrated below.
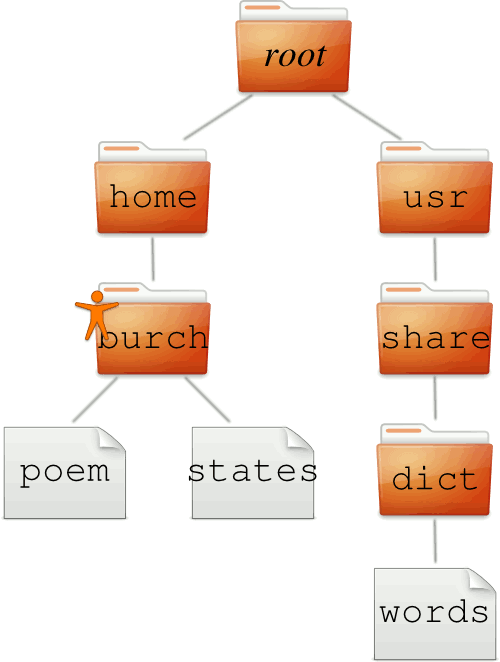
There is a top-level directory called the root directory, which is represented with a simple slash character '/'. The root directory contains several directories, included home and usr illustrated here. The home directory typically contains a directory corresponding to each user in the system, like burch. Each of these directories in the home directory for the respective user, and it is used for holding the user's documents, like the poem and states files in the illustration. Users often organize their own files into a hierarchy of directories within their home directory.
Within the terminal, you are located
at all times
within some directory in this hierarchy, called your current
working directory. By default, this is your home directory,
marked by the person in the above illustration. However, you can
change this using the cd command.
burch@galadriel:~$ cd /
burch@galadriel:/$ cd usr
burch@galadriel:/usr$ cd share
burch@galadriel:/usr/share$ cd dict
burch@galadriel:/usr/share/dict$
Notice that with each command, the prompt changes to reflect that we have now moved to a different directory.
Now that we're in the dict directory, any mention of a file's name will refer to the file of that name in the dict directory. This allows us to do searches within the directory.
burch@galadriel:/usr/share/dict$ grep nuu < words
continuum
continuum's
continuums
Each directory and file has a simple name like dict or poem. Each also has a pathname stating how that file can be found starting from the root directory: This pathname consists of the name of each directory or file starting from the root, separated by slashes. For example, the poem file's pathname would be /home/burch/poem, while the dict directory's pathname would be /usr/share/dict.
We can give the full pathname of a directory to cd instead of giving just single directory names.
burch@galadriel:/usr/share/dict$ cd /home/burch
burch@galadriel:~$
Notice how the prompt now indicates the current directory with a tilde character '~'. This character is a convenient abbreviation for your home directory's pathname, which is handy because you are usually working from within your home directory. Thus, I could alternatively write ~/poem as the pathname for the poem file in the above illustration (assuming that burch is my home directory).
Because of this tilde abbreviation, you could alternatively
use cd to enter your home directory using the command
cd ~
. (In this particular example,
you could simply use cd
with no command-line arguments: The cd command
assumes the home directory when no directory is given.)
If you want to access a file somewhere outside your current directory, you can of course use cd to enter the directory containing the file and then use that file's name. But you can also avoid changing the current directory by using the file's pathname.
burch@galadriel:~$ grep nuu < /usr/share/dict/words
continuum
continuum's
continuums
This example shows a command issued from the user's home directory (as represented by the tilde in the prompt), but it manages to access the words file located in an entirely different directory.
11. Learning more: man, other commands
In this short tutorial, we've seen a few basic Linux commands with some command-line options; and we've seen how to use redirection and pipes. But it's just a mild start, and there's a lot more to learn to be truly proficient with the command line.
One very important tool for learning more is the man command, which provides access to a built-in electronic manual that describes each command available to you; the reference for any command is called its man page. To use it, you provide a command-line argument that names the command that you want to read about.
burch@galadriel:~$ man sort
SORT(1)                          User Commands                         SORT(1)

NAME
       sort - sort lines of text files

SYNOPSIS
       sort [OPTION]... [FILE]...
       sort [OPTION]... --files0-from=F

DESCRIPTION
       Write sorted concatenation of all FILE(s) to standard output.

       Mandatory  arguments  to  long  options are mandatory for short options
  (and so on)
Usually the reference will be quite long. The man command will show you a screenful of text and wait for you to press the space bar before going on.
Unfortunately, the man command is really not very useful unless you happen already to know the name of the command that you want more information about! To help you, here are the names of 22 different commands that are particularly useful.
| Directory manipulation | |
| cd | changes into a new current working directory (in Section 10) |
| du | shows the disk usage of every subdirectory in a directory hierarchy |
| find | locates files within a directory hierarchy |
| ls | lists files in a directory (and possibly information about the files) |
| mkdir | makes a new directory |
| rmdir | removes an empty directory |
| File manipulation | |
| cat | dumps the contents of a file (or files) onto output |
| cp | copies a file into another name |
| mv | moves a file to another location (potentially renaming it) |
| rm | removes a file permanently from the disk |
| Text selection | |
| cut | outputs a range of characters from each line of the input (in Section 6) |
| grep | outputs lines from the input matching a given pattern (in Section 3) |
| head | outputs a number of lines at the beginning of the input (in Section 6) |
| tail | outputs a number of lines at the end of the input |
| Text processing | |
| nl | outputs the input with each line numbered |
| sort | outputs the result of sorting the input (in Section 8) |
| tr | translates characters from one set to another |
| uniq | outputs the input with adjacent duplicates displayed only once (in Section 9) |
| wc | outputs the number of lines, words, and characters in the input |
| Other commands | |
| echo | outputs the command-line arguments |
| man | displays a manual page describing a command (in Section 11) |
| ssh | remotely accesses the terminal on a different computer |
One other resource worth mentioning is other people's
introductions to using the Linux command line. The Further reading
section contains several
on-line resources that you might examine.
Summary of described commands
- cd directory
(Section 10) changes into a different current directory
- cut
(Section 6) outputs a range of characters from each line of the input
-f number — selects one or more tab-delimited columns from each line - grep needle
(Section 3) outputs lines from the input matching a given pattern
-i — ignore distinction between capital and lower-case letters -v — output lines that do not match the pattern - head
(Section 6) outputs a number of lines at the beginning of the input
-n number — output the first number lines from the input - sort
(Section 8) outputs the result of sorting the input
-k number — sort based on column number from each line -n — use numerical ordering (2<10), not dictionary ordering (10<2) -r — display lines in reverse order - uniq
(Section 9) outputs the input with adjacent duplicates displayed only once
-c — display number of adjacent duplicates of each line
Further reading
Here are some on-line references that could be useful in learning more about using the Linux command line. Some of the titles indicate that they're discussing UNIX, but Linux is closely based on the UNIX operating system; nearly everything you might read about UNIX also applies to Linux.
- LinuxCommand.org, by William E. Shotts, Jr.
- UNIX Tutorial for Beginners, by M. Stonebank.
- UNIXhelp for Users, from the University of Edinborough