Chapter 2. A brief look at HTML
Before studying the development of dynamic Web pages via PHP, one must first understand how to develop static Web pages using HTML alone. This chapter provides a brief introduction to this extensive formatting language. Those who already understand HTML can safely skip ahead to the following chapter; those who know HTML but not XHTML should probably read Section 2.4.
2.1. Tags and elements
An HTML file is a simple text document, which typically contains only the characters you can type on the keyboard, with no formatting information. As long as all you want to include is simple text with no formatting, that's fine: You can just type the text directly into the file.
But any serious page will include some formatting. To do this,
we use <em> tag, which indicates that the following
characters should be emphasized (which most Web browsers
display by placing them in italics). Once the Web browser sees the
<em> tag, all following characters will be
emphasized until the Web browser reaches the tag </em>.
As an example, suppose we want to display HTML is
simple.
We'd write the following.
HTML is <em>simple</em>.
(By the way, you'll notice that this book displays tags in a different color and in italics. This coloring and font change is not part of the HTML; it's just to make the HTML easier to read. Many HTML editors will also automatically color tags differently from regular text, also to help with reading.)
HTML ignores all whitespace (spaces, tabs, line breaks) except insomuch as it indicates word breaks. Thus, I could equivalently write the above example as below, with the same result. Obviously, you wouldn't want to write it as below, but the point is that you could.
HTML


is <em>


simple

</em>.
This brings up a natural question: How do I handle a
document with multiple paragraphs? Paragraphs in HTML are supposed to be
indicated by enclosing each paragraph in a
pair of tags <p> and </p>. For example, we might
write the following.
<p>Bob asked, "What's that fun book you're reading?"</p>

<p>"<em>Programming via PHP</em>," responded Alice.</p>
This would be displayed on the Web browser as two paragraphs:
Bob asked, "What's that fun book you're reading?"
"Programming via PHP," responded Alice.
HTML is systematic in having opening
tags and closing tags, like <p>
and </p>, where the closing tag's
name is identical to the opening tag but with a slash before it.
In fact, we think of tags in pairs, enclosing the content in between.
In HTML-speak, the whole group of opening tag, then content, then
closing tag, is called an element.
When combining elements, it's important that they be nested.
For example, you might want to combine the <b> tag for
boldface and the <em> tag for italics, in order to get
bold italics. There are four ways that you
might hope to accomplish this. Two are wrong, and two are correct, as
diagrammed below.
Figure 1.1: Combining HTML elements through nesting.
Invalid examples Correct examples
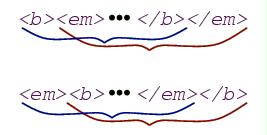

The examples on the left are wrong, since the elements overlap. Instead, one element should lie entirely within the other, as in the examples on the right.
2.2. Attributes
Some tags allow additional information to be specified for
customizing the tag's behavior. The most prominent example is the
<a> tag, which allows one to insert an
anchor, which is HTML-speak for a link to another page.
In this case, the additional information would be the name of the other
page to which we want to link. In the following example, we link to the
U S Naval Observatory's page reporting the current time.
<a href="http://tycho.usno.navy.mil/cgi-bin/timer.pl">What time is it?</a>
This HTML is displayed as the following.
What time is it?
As you can see in this example, specifying an attribute is a matter of including some additional information in the opening tag, between the tag name and the closing angle bracket. This additional information is always in the form of an attribute name, followed by an equals sign, followed by the attribute value enclosed in quotation marks.
By the way, when you happen to use an attribute to reference a URL,
as we have with the <a> tag's href attribute,
you actually have two options on how to specify it. Above, we used an
.
This is quite a bit more convenient than having to type the page's
full URL, and it allows the directory to be copied somewhere else
without having to change every page.<a href="first.html">a first Web page</a>
2.3. Entities
One problem that must eventually come up if you write lots of HTML is: What do I do if I actually want to display a less-than sign ('<')? Simply placing the less-than sign in the HTML can be problematic, as Web browsers generally see this as an indication of the start of a tag.
HTML's solution to this problem is to create a special code for
less-than signs, starting with an ampersand ('&'): You write
. And you can write <
for a
greater-than sign. And when you want an ampersand in a document —
which, indeed, is more likely than wanting '<' or '>'
— you can write >
.&
These ampersand-prefixed names are called entities
in HTML-speak. There are actually many more, providing support for
accented characters (such as ñ for 'ñ', needed
for Spanish) and other useful characters (such as — for
an em dash '—' — which happens to be my favorite). These
other definitions are necessary because HTML
is supposed to be transmitted using the ASCII encoding for characters,
an encoding that basically any communications device today will
recognize. Unfortunately, ASCII code was originally designed
specifically for transmitting only what is typed on an English keyboard,
so it ends up providing only 86 characters; everything else should be
typed as an entity.
2.4. A note on HTML versions
Other the years, standards organizations have created a series of
several HTML versions. We're actually examining XHTML, a relatively
strict version of HTML introduced in 2005. (PHP works with both HTML
and XHTML, but I like the more systematic XHTML.) Since the
establishment of the first HTML standard in 1995, HTML has always had
two sets of rules: the official
rules, set by the standard, and
the de facto rules, dictated by what the most popular browsers
of the day happen to be able to read. The browsers have always striven
to be extremely lax with interpreting Web pages, because users want to
view the largest range of Web pages possible. For example, for some
tags, the standards have always required the opening tag to have
a corresponding closing tag, but most Web browsers display a page
correctly even when the closing tag is missing. And some Web developers
consistently take advantage of that fact.
This laxity becomes problematic as a wider variety of Web browsers come into use, as these de facto rules aren't formally written down anywhere, and the inevitable result is that some pages can only be viewed in particular brands of Web browser. It's particularly problematic now that specialized browsers are built for small devices, such as cellphones, where memory is at a premium and so there is no room to deal with handling the wide variety of HTML variations. XHTML is written particularly with an eye to defining a systematic standard to ease the problem of developing compatible browsers.
(Also, XHTML also is an attempt to fit HTML into a more generic standard, called XML, designed for representing any data of any sort. The definition of XML was based on HTML, but the XML standard is more general, defining how tags are written without actually defining individual tags, since the particular tags will depend on what sort of data is being represented.)
Important differences between earlier versions of HTML and XHTML include:
HTML was defined to ignore whether letters in tag and attribute names were capital letters or lower-case letters. In fact, the tradition was to use all capital letters. But XHTML is case-sensitive, and it consistently requires using lower-case letters.
In XHTML, all tags must be closed, without exception, whereas HTML has some tags (such as
<br>, for inserting a line break) where the closing tag is optional.XHTML introduces a shortcut (
<br />) so that an element with no content can be both opened and closed with a single tag, by placing the slash just before the closing '>'. The older browsers don't recognize this slash, but all of the major browsers simply ignore it, so it doesn't present a major problem. Officially in XHTML, the space before the slash is optional — that is, I could write
to break a line — but this confuses some prominent pre-XHTML Web browsers, so we'll consistently use a space.<br/>XHTML has some specific requirements for the file's overall structure, as we'll see in the next section.
2.5. Web page structure
Each XHTML file is required to have a particular overall structure. The easiest thing to do is to show you an XHTML file and learn which parts will vary from page to page. Figure 2.2 contains a basic XHTML page.
Figure 2.2: A complete XHTML file.
<!DOCTYPE html PUBLIC "-//W3C//DTD XHTML 1.0 Transitional//EN"
    "http://www.w3.org/TR/xhtml1/DTD/xhtml1-transitional.dtd">

<html xmlns="http://www.w3.org/1999/xhtml">

<head>

<meta http-equiv="content-type" content="text/html; charset=utf-8" />

<title>My first Web page</title>

</head>


<body>


<h1>A simple Web page</h1>


<p>Here I am demonstrating my Web page expertise. I'm <em>sure</em>

you're quite unimpressed.</p>


</body>

</html>
From a practical point of view, you can just copy and paste this file every time you create a Web page. There will be only two parts that vary from file to file.
- The contents of the
<title>element will change to reflect the page's title. Most browsers display this title in the browser window's title bar, and most search engines will use this title to identify the page. - The contents of the
<body>element will change to reflect what should actually appear in the browser window. It is here that you will place all of the tags we had been talking about previously.
But it would be nice to have some understanding of what is going on with the rest of the file. First, I don't really want to get into the first two lines. These weird lines have to do with conformance to the more generic XML standard, and there will be no reason for you to change them.
After that, you see more typical HTML text, though it uses several
tags that we haven't seen before: <html>, <head>,
<title>, and <body>. Before we look at them
explicitly, it's useful to examine Figure 2.3,
which diagrams how the various elements are nested.
Figure 2.3: Nesting structure of the XHTML in Figure 2.2.

All XHTML files will have a nesting structure that at the top matches
the structure of Figure 2.3:
The entire document should be contained in an <html> element
(whose opening tag should include an xmlns attribute, which
you can safely copy mindlessly). And inside the <html>
element should be exactly two elements, a <head> element
and the <body> element.
The <head> element specifies information about the Web
page. In this book, we'll include only the two elements required to
appear in the <head> element,
a <meta> element indicating how the page is encoded
and a <title> element indicating the page's title.
The <meta> element is again something that you can copy
mindlessly from page to page; it specifies how the server will
send unusual characters (i.e., not appearing on an English
keyboard). It's possible that the
<meta> element should technically be slightly
different from what's in Figure 2.2; that would depend
on how your Web server encodes pages. In the end, it isn't likely to
matter if it ought to be different from what's in
Figure 2.2, since your XHTML file will generally
contain only characters found on an English keyboard.
There are no requirements concerning the <body> element.
Inside this element goes all of the page contents
— that is, what should be displayed in the main part of the
browser window when the page is viewed.
2.6. Glossary of significant tags
Below is a listing of just a smattering of important tags, some of which are described for the first time below.
<a href="URL">Specifies an anchor, where the user can click on the content inside the element to go to another page. The destination page is specified in the tag's href attribute.
<b>Specifies that the enclosed text should appear in boldface.
<body>Encloses the contents of the Web page. This should always be nested directly inside the
<html>element, following the<head>element.<br />Inserts a line break. This element never has any meaningful content. Note that you should use
<p>to handle paragraph breaks.<em>Specifies that the enclosed text should be emphasized, typically by appearing in italics.
<h1>Specifies a level-1 heading, which will typically be displayed using large boldface characters. Note that this should not appear inside a
<p>element.<h2>Specifies a level-2 heading, which will typically be displayed using large boldface characters, but not quite so large as produced by
<h1>. This also should not appear inside a<p>element. You can think of the intended relationship between<h1>and<h2>elements as the relationship between chapter headings and section headings.<head>Encloses other elements giving information about the Web page (not including its content). This should always be nested directly inside the
<html>element.<html xmlns="URL">Encloses the entire contents of the HTML document. The xmlns attribute is to refer to a special XML specification file; an appropriate value for this attribute, which you can safely copy into every file you create, is
http://www.w3.org/1999/xhtml
.<img src="URL" />Indicates that the browser should display an image if possible. The browser would retrieve the image from the location specified in the tag's src attribute. The
<img>element will never have any contents, so you'd usually combine the opening and closing tags.<p>Encloses each paragraph of a document.
<title>Specifies the Web page's
title
. This typically appear in the Web browser's title bar or tab, and it also typically appears when the user views theBack
menu of recently visited pages. The<title>element should only appear in a page's<head>section.
The above selection is just a small smattering of the many tags available in HTML. It's enough for the purpose of learning PHP, but it's certainly not enough to compose attractive pages. To learn more about HTML, I recommend acquiring and reading Elizabeth Castro's book, HTML, XHTML & CSS, from Peachpit Press.

Programming via PHP is licensed under a Creative Commons Attribution-Share Alike 3.0 License.
Based on a work at http://www.cburch.com/books/php/.