Movies actually are shot at 24 frames per second, or 41.667 ms per frame. This causes a bit of flicker, so it makes sense to go a bit faster, particularly with such a high-contrast image. But beyond, say, 100 frames per second, there's no point, since that's beyond the human eye's ability. Even if you think you could perceive faster frame rates, it won't help because standard monitors refresh at a slower rate than that.
Chapter 6. Graduating to a bigger sandbox
Turtles can only carry us so far in our quest to learn about programming. To go further, we'll switch to the more complex and richer domain of drawing shapes, which allow programs with more flexible graphics.
6.1. A simple program
We begin with the elementary program of Figure 6.1, which displays the window of Figure 6.2.
Figure 6.1: The
BasicBallprogram.1 import acm.program.*;
2 import acm.graphics.*;
3 import java.awt.*;
4
5 public class BasicBall extends GraphicsProgram {
6 public void run() {
7 Color red;
8 red = new Color(255, 0, 0);
9
10 GOval ball;
11 ball = new GOval(25, 25, 50, 50);
12 ball.setFilled(true);
13 ball.setFillColor(red);
14 this.add(ball);
15 }
16 }
Figure 6.2: Running
BasicBall.
This program makes two important changes to the code surrounding the
program's main body, which we have been blindly copying: First, it
imports the contents of several packages of classes, in
lines 1 to 3. And in
line 5, we declare our program to extend
GraphicsProgram rather than TurtleProgram. We will
continue to defer discussion of exactly what this means; but these two
changes switch our context from talking about turtles to talking about
graphics.
The body of the program, lines 7
to 14, use the GOval class found in the
acm.graphics package. Objects of this class represent ovals on
the screen.
(You may wonder about the initial G. Before GOval was
written, a class was already written named Oval, and so the
GOval designers felt it best to include the G to avoid
ambiguity.
Think of the G as a silent
letter, as in the words gnu and knight.)
Here is documentation for the constructor and methods of GOval
used in our program.
GOval(int x, int y, int width, int height)(Constructor) Constructs an oval, with location and size dictated by inscribing it within a rectangle. The rectangle's upper left corner is at (
x,y), and its size is described bywidthandheight. (This rectangle is used for determining location and size only; it is not actually drawn.)void setFilled(boolean value)Changes whether only the interior of this oval is drawn filled (if
valueistrue) or whether only the outline of this oval is shown. By default, this isfalse: Only the outline of this oval is shown.void setFillColor(Color value)Changes the color with which to fill this oval's interior. Note that this color is only used when this oval has been directed to fill the interior via
setFilled. By default, the interior color is black.
In BasicBall, when we construct the oval, we use the same
number for both the width and the height. As a consequence, the bounding
box for the oval is a square, and so the oval itself will end up being a
circle.
After constructing the circle, we invoke setFilled on the
circle so that its interior will be drawn in a solid color. Without this
line, the circle will be transparent.
Then we invoke setFillColor on the circle to alter
the interior color from its default of black. The parameter for
setFillColor is to
be a Color object, just as we saw with the Turtle class's
setPenColor method. In BasicBall, we pass red as
our parameter, so that the circle will be filled with red.
The final line of the program uses a method from
GraphicsProgram for adding shapes into the window. Without this,
the circle would not be drawn at all.
void add(GObject shape)Adds
shapefor drawing within this window. Ifshape's class is written properly, any modifications toshapewill be reflected immediately in this window.
Notice that add takes a GObject as a parameter, but we are
passing it a GOval. As it happens, GOval is written so
that any GOval shape can also act as a GObject object.
We'll return to this theme later in Chapter 11.
6.2. Using shortcuts
We've been avoiding some programming shortcuts in order to
keep concepts separate.
But since we'll be soon be writing larger programs, it's time to
introduce them now. To illustrate, we'll take our BasicBall
program of Figure 6.1 as a starting point,
and we will rewrite its main body as follows.
  7  GOval ball = new GOval(25, 25, 50, 50);

  8  ball.setFilled(true);

  9  ball.setFillColor(new Color(255, 0, 0));

 10  add(ball);
There are three differences between this and our initial version.
On line 7, we combine the declaration and the initialization of a variable. Previously, we would have written this as two separate lines, to emphasize the fact that these are two separate actions. But the two concepts occur together very often, and so Java allows them to be combined onto one line when appropriate.
On line 9, we create the
Colorobject inside the parentheses, rather than create a separate variable to refer to theColorobject. For a short program like this, it is a bit easier to understand when we use the extra variablered. But since this program would use that variable only once, we can instead avoid it entirely by simply substituting the variable's value into the one place where we want it.On line 10, we write
addwhere before we wrotethis.add. If you just write a method name without naming the object to which you want it applied, Java will assumethisas a default.
None of these changes have anything to do with the new graphics packages we are using: We could just as easily have been using these shortcuts from the beginning, with our turtle examples. We avoided them until now to help with learning. But the shortcuts are too convenient to avoid forever, so we're introducing them now.
6.3. Animation
We will now animate our ball so that it appears to move across the
screen. The trick to animating the ball is the same as in the movies:
We will wait for a tiny amount of time, then move the ball slightly, and
repeat. We might as well use the same amount of time to wait between
frames
as they use in the movies: 40 ms.

To tell the computer to stall the program for an amount of time, we will
use an additional method found in GraphicsProgram.
void pause(int millis)Stalls for
millismilliseconds before returning control to the code invoking thepausemethod.
To move the ball, we'll make use of GOval's move
method.
void move(int dx, int dy)Moves this oval
dxpixels to the right anddypixels down. A negative value for a parameter moves this oval left/up.
Figure 6.3 contains the resulting program. When
executed, the program moves to the right and down the window.
Eventually, it moves beyond the window's boundary, and you can no longer
see it moving without resizing the window. In the next chapter, we'll
look at how we can get the ball the bounce
off the window's
boundaries.
Figure 6.3: The
MovingBallprogram.1 import acm.program.*;
2 import acm.graphics.*;
3 import java.awt.*;
4
5 public class MovingBall extends GraphicsProgram {
6 public void run() {
7 GOval ball = new GOval(25, 25, 50, 50);
8 ball.setFilled(true);
9 ball.setFillColor(new Color(255, 0, 0));
10 add(ball);
11
12 while(true) {
13 pause(40);
14 ball.move(3, 2);
15 }
16 }
17 }
6.4. Compounding shapes
The acm.graphics package contains many classes for drawing
different shapes: GArc, GLine, GOval, and
GRect are the four most basic choices. If you look at the full
documentation, you'll see several other much less useful choices, of
which some are not even shapes.
One particularly useful class is GCompound. While not
itself a shape, it allows you to combine several shapes into a single
object, which can then be manipulated as a group.
GCompound()(Constructor) Constructs a compound object, initially containing no shapes.
void add(GObject shape)Adds
shapeas one of the objects that is part of this compound object.void move(double dx, double dy)Moves all shapes in this compound object
dxpixels to the right anddypixels down. A negative value for a parameter moves all shapes left/up.
Figure 6.4 contains a program where a
GCompound is useful. In this program, we combine a circle, a
rectangle, and two lines into one GCompound that has the
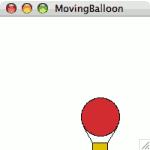
appearance of a hot air balloon. We then animate the balloon's descent
down to the bottom of the window, where it lands (i.e., stops).
(Note the usage of getHeight at the end of the while
loop's condition: Because we don't specify the object to which to apply
getHeight, the compiler assumes we want to apply it to
this — i.e., the window. Luckily, the window has such a
method.)
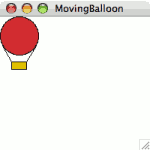
Figure 6.4: The
MovingBalloonprogram.1 import acm.program.*;
2 import acm.graphics.*;
3 import java.awt.*;
4
5 public class MovingBalloon extends GraphicsProgram {
6 public void run() {
7 // Create the circle that will appear as the balloon's top
8 GOval ball = new GOval(0, 0, 50, 50);
9 ball.setFilled(true);
10 ball.setFillColor(new Color(208, 48, 48));
11
12 // Create a rectangle that will appear as the balloon's basket
13 GRect basket = new GRect(15, 60, 20, 10);
14 basket.setFilled(true);
15 basket.setFillColor(new Color(224, 192, 0));
16
17 // Now put these together, along with ropes connecting them
18 GCompound balloon = new GCompound();
19 balloon.add(ball);
20 balloon.add(new GLine(3, 39, 15, 60)); // left rope
21 balloon.add(new GLine(48, 39, 35, 60)); // right rope
22 balloon.add(basket);
23 add(balloon);
24
25 // Move the whole combination down and right until it lands on
26 // the window's bottom. (We add 70 to balloon's y because
27 // bottom of basket is 70 pixels below balloon's origin.)
28 while(balloon.getY() + 70 < getHeight()) {
29 pause(40);
30 balloon.move(1, 1);
31 }
32 }
33 }
Figure 6.5: Running
MovingBalloon.
(a) (b) (c)

Modify the MovingBalloon program to draw a land or water
vehicle of your choice, such as a wagon, unicycle, sailboat, or aircraft
carrier. Your vehicle should incorporate at least three shapes (not
necessarily different types) and at least two colors.
Modify the MovingBall program of
Figure 6.3 so that the ball follows a trajectory
as if it were thrown. To do this, you will want to give the ball an
initial velocity, which is negative in the y direction.
With each frame, the velocity in the y direction should
increase by a fixed amount per animation frame, to simulate the ball's
acceleration due to gravity.

Programming via Java is licensed under a Creative Commons Attribution-Share Alike 3.0 License.
Based on a work at http://www.cburch.com/books/java/.